No hace mucho, Postman introdujo el seguimiento de versiones con Git para tu trabajo. Esto facilita el registro de cambios.
Con el seguimiento vía Git, también agregaron una opción de IA para rastrear cambios en la API y actualizar automáticamente las solicitudes dentro de Postman, aunque esto requiere una suscripción paga.
Un truco es usar tu suscripción de IA existente, como Copilot, Claude u otros. Veamos cómo hacerlo.
Crear un entorno Git en Postman
Primero, necesitamos crear un entorno Git en Postman. Elige Create → From Git repository y selecciona la carpeta de tu código.
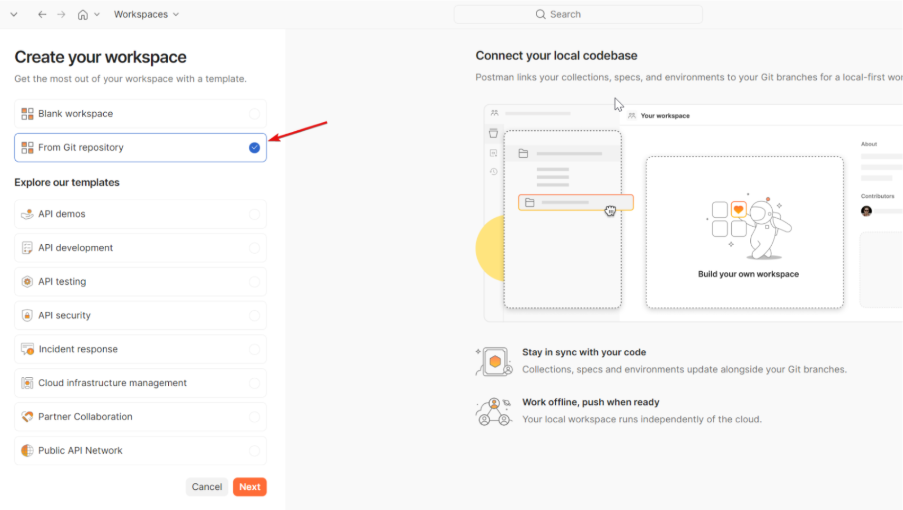
Esto creará dos carpetas:
NOTA: Ten en cuenta que los archivos de entorno probablemente contengan secretos. Añádelos a .gitignore si es necesario.
Definir instrucciones de Postman
Primero, define las instrucciones para cómo crear cada elemento. Puedes obtener el archivo completo al final del post:
Revisemos la estructura del archivo:
- Descripción de carpetas: dentro de la carpeta
postman, define qué tipo de información se guarda en cada subcarpeta. Por ejemplo, los entornos son almacenados como archivos YAML en /environments.
- Descripción de elementos: una vez sabes dónde va cada archivo, define los pasos para crearlos.
Ejemplo:
name: PRO
values:
  - key: base_url
    value: "https://api.example.com"
    enabled: true
Añade cualquier instrucción adicional: uso de claves, manejo de errores, etc.
Configurar instrucciones principales
Una forma de usarlo es creando un agente o configurando las instrucciones principales en Copilot. Cada vez que el agente haga un cambio en un controlador, debería reflejarlo en Postman.
Un ejemplo:
Whenever a controller is added, modified, or removed, the Postman collection must be updated to reflect that change.
Use `postman/instructions.md` as the instructions for how to read, edit, and create Postman collections, folders, requests, and environment files.
If a request requires secrets or environment-specific values, retrieve them from the `.deploy` folder and reference them through environment variables when possible.
Every request must include at least one minimal validation using Postman scripts. At minimum, add a basic response validation such as a status code check.
En esencia, necesitas especificar dónde obtener la información y qué quieres que el agente haga.
Otro caso de uso
Con las instrucciones de Postman disponibles, puedes usarlas cuando quieras sin crear un agente específico. En mi caso, quiero poder activar el proceso ocasionalmente.
Para ello, simplemente agrego esto a mi solicitud cuando lo necesito:
Use `postman/instructions.md` as the instructions for how to read, edit, and create Postman collections, folders, requests, and environment files.
....
Aquí describo lo que quiero hacer.
Conclusión
Aunque conozco otras herramientas en el mercado, especialmente me gusta Postman, y estas instrucciones para Copilot aunque simples me ayudan a mantener mis proyectos actualizados sin perder tiempo en tareas repetitivas.
Sobre todo, me ha permitido crear colecciones en Postman donde antes no tenía, o donde las existentes estaban muy desactualizadas.
Esta es una manera sencilla de crear y modificar tus colecciones de Postman usando Copilot. Si quieres explorar otros métodos, te recomiendo leer sobre cómo sincronizar colecciones de Postman vía OpenAPI.
Copilot instructions
Finalmente, aquí tienes el archivo completo de instrucciones para Copilot:
# Postman Guide

Here you have all the information of the postman git structure

## Repository Structure

postman/
  collections/
    <CollectionName>/
      .resources/
        definition.yaml          # Collection definition
      <FolderName>/
        .resources/
          definition.yaml        # Folder definition
        <RequestName>.request.yaml
      <RequestName>.request.yaml
  environments/
    <EnvName>.environment.yaml

## Component Definitions

### Collection

Location: postman/collections/<CollectionName>/.resources/definition.yaml

$kind: collection
name: <CollectionName>

### Folder

Location: postman/collections/<CollectionName>/<FolderName>/.resources/definition.yaml

$kind: folder
name: <FolderName>

### Request

Location: <RequestName>.request.yaml (inside collection or folder)

Minimum structure:
$kind: http-request
name: <RequestName>
url: "[base_url]/path"
method: GET|POST|PUT|DELETE|PATCH

Complete example:
$kind: http-request
name: Get Articles
url: "[base_url]/api/v1/articles"
method: GET
headers:
  x-api-key: "[api_key]"
  Content-Type: application/json
queryParams:
  customerId: "[customerId]"
  page: "1"
body:
  type: json
  content: |+
    {
      "orderNumber": "ORDER-123"
    }
scripts:
  - type: afterResponse
    code: |-
      pm.test("Status code is 200", function () {
        pm.response.to.have.status(200);
      });
    language: text/javascript
order: 2000

## Request Fields Reference

### Required
- $kind: http-request
- name: Request name
- url: Request URL
- method: HTTP method

### Optional
- headers: Map or list format
- queryParams: Query string parameters
- body: Request body (json, formdata, raw, etc.)
- auth: Authorization definition
- scripts: Pre-request or post-response scripts
- order: UI ordering value

### Headers Formats

Map format:
headers:
  x-api-key: "[api_key]"
  Content-Type: application/json

List format:
headers:
  - key: Accept
    value: application/json
    enabled: true

### Body Types

JSON:
body:
  type: json
  content: |+
    {
      "field": "value"
    }

Form-data:
body:
  type: formdata
  content:
    - key: field1
      value: value1
    - key: file
      type: file
      src: ./path/to/file.txt

## Environment Variables

Variables use the syntax [variable_name]. They must be defined in postman/environments/<EnvName>.environment.yaml:

name: PRO
values:
  - key: base_url
    value: "https://api.example.com"
    enabled: true
  - key: api_key
    value: "secret_key_value"
    enabled: true
  - key: customerId
    value: "12345"
    enabled: true

## Critical Rules

1. Always use [variable_name] for:
   - Base URLs
   - API keys
   - Environment-specific values
   - Reusable values

2. Never hardcode:
   - Secrets or credentials
   - Environment-specific URLs
   - Customer IDs or similar data

3. YAML requirements:
   - Valid YAML syntax
   - Correct indentation (2 spaces)
   - Proper string quoting for URLs and values

4. Structure requirements:
   - Every collection must have .resources/definition.yaml
   - Every folder must have .resources/definition.yaml
   - Request filenames must end with .request.yaml

5. Variable validation:
   - Verify all [variables] exist in environment files
   - Check variable names match exactly (case-sensitive)

## Editing Instructions

- Edit collection name: Modify name in collection's .resources/definition.yaml
- Edit folder name: Modify name in folder's .resources/definition.yaml
- Edit request: Modify the .request.yaml file directly
- Add/remove fields: Update YAML maintaining proper structure
- Change environment variables: Edit files in postman/environments/

---

## Best Practices & Common Mistakes

### All Variables Must Be Declared

Problem: Using [variableName] in URLs or parameters without declaring them in the environment file.

### Checklist for New Collections

When creating or updating Postman collections:

- [ ] Environments: Create environment files for ALL deployment environments
- [ ] Variables: Declare ALL variables used in URLs, headers, and bodies
- [ ] Consistency: Use same variable names across all requests
- [ ] Tests: Add minimum status code validation to every request and model validation if posible
- [ ] Model validation: Add response structure tests for GET endpoints
- [ ] Authentication: Include required headers (e.g., X-Api-Key, Authorization) for all protected endpoints
- [ ] Sample bodies: Provide realistic example JSON bodies for POST/PUT requests
- [ ] Documentation: Add comments in complex request bodies explaining field purposes