Not long ago, Postman introduced Git version tracking for your work. This makes tracking changes much easier.
Along with Git tracking, they also added an AI option to monitor API changes and update requests automatically in Postman, although this requires a paid subscription.
A workaround is to use your existing AI subscription, like Copilot, Claude or others. Let’s see how to do it.
Create a Git Environment in Postman
First, we need to create a Git environment in Postman. Choose Create → From Git repository and select the folder in your code.
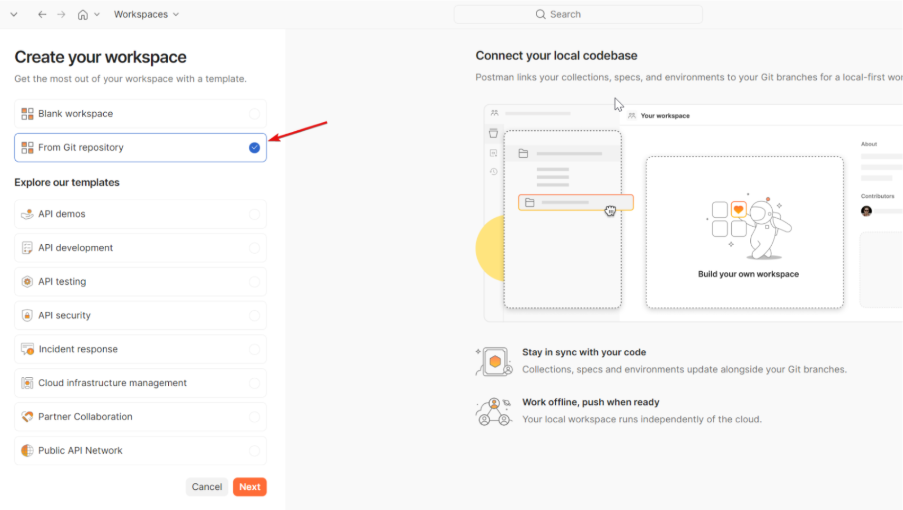
This will create two folders:
NOTE: Keep in mind that environment files will likely contain secrets. Add them to .gitignore if necessary.
Define Postman Instructions
First, define the instructions for how to create each item. You can get the complete file at the end of this article:
Let’s review the file structure:
- Folder descriptions: Inside the
postman folder, define what type of information goes in each subfolder. For example, environments are stored as YAML inside /environments.
- Item descriptions: Once you know where each file goes, define the steps to create them.
Example:
name: PRO
values:
  - key: base_url
    value: "https://api.example.com"
    enabled: true
Add any extra instructions: key usage, error handling, etc.
Set Main Instructions
One way to use this is by creating an agent or configuring the main instructions in Copilot. Every time the agent changes a controller, it should update Postman accordingly.
Example:
Whenever a controller is added, modified, or removed, the Postman collection must be updated to reflect that change. Use `postman/instructions.md` as the instructions for how to read, edit, and create Postman collections, folders, requests, and environment files. If a request requires secrets or environment-specific values, retrieve them from the `.deploy` folder and reference them through environment variables when possible. Every request must include at least one minimal validation using Postman scripts. At minimum, add a basic response validation such as a status code check.
Basically, you need to specify where to get the information and what you want the agent to do.
Another Use Case
With the Postman instructions available, you can use them anytime without creating a dedicated agent. In my case, I want to be able to trigger the process occasionally.
For that, I just add this to my request when needed:
Use `postman/instructions.md` as the instructions for how to read, edit, and create Postman collections, folders, requests, and environment files.
....
Aquí describo lo que quiero hacer.
Conclusion
Although I am familiar with other tools on the market, I especially like Postman, and these simple Copilot instructions help me keep my projects up to date without wasting time on repetitive tasks.
More importantly, it has helped me create Postman collections where I didn’t have one before, or where existing ones were very outdated.
This is an easy way to create and modify your Postman collections using Copilot. If you want to explore other methods, I recommend reading about how to sync Postman collections via OpenAPI.
Copilot Instructions
Finally, here is the complete file of instructions for Copilot:
# Postman Guide

Here you have all the information of the postman git structure

## Repository Structure

postman/
  collections/
    <CollectionName>/
      .resources/
        definition.yaml          # Collection definition
      <FolderName>/
        .resources/
          definition.yaml        # Folder definition
        <RequestName>.request.yaml
      <RequestName>.request.yaml
  environments/
    <EnvName>.environment.yaml

## Component Definitions

### Collection

Location: postman/collections/<CollectionName>/.resources/definition.yaml

$kind: collection
name: <CollectionName>

### Folder

Location: postman/collections/<CollectionName>/<FolderName>/.resources/definition.yaml

$kind: folder
name: <FolderName>

### Request

Location: <RequestName>.request.yaml (inside collection or folder)

Minimum structure:
$kind: http-request
name: <RequestName>
url: "[base_url]/path"
method: GET|POST|PUT|DELETE|PATCH

Complete example:
$kind: http-request
name: Get Articles
url: "[base_url]/api/v1/articles"
method: GET
headers:
  x-api-key: "[api_key]"
  Content-Type: application/json
queryParams:
  customerId: "[customerId]"
  page: "1"
body:
  type: json
  content: |+
    {
      "orderNumber": "ORDER-123"
    }
scripts:
  - type: afterResponse
    code: |-
      pm.test("Status code is 200", function () {
        pm.response.to.have.status(200);
      });
    language: text/javascript
order: 2000

## Request Fields Reference

### Required
- $kind: http-request
- name: Request name
- url: Request URL
- method: HTTP method

### Optional
- headers: Map or list format
- queryParams: Query string parameters
- body: Request body (json, formdata, raw, etc.)
- auth: Authorization definition
- scripts: Pre-request or post-response scripts
- order: UI ordering value

### Headers Formats

Map format:
headers:
  x-api-key: "[api_key]"
  Content-Type: application/json

List format:
headers:
  - key: Accept
    value: application/json
    enabled: true

### Body Types

JSON:
body:
  type: json
  content: |+
    {
      "field": "value"
    }

Form-data:
body:
  type: formdata
  content:
    - key: field1
      value: value1
    - key: file
      type: file
      src: ./path/to/file.txt

## Environment Variables

Variables use the syntax [variable_name]. They must be defined in postman/environments/<EnvName>.environment.yaml:

name: PRO
values:
  - key: base_url
    value: "https://api.example.com"
    enabled: true
  - key: api_key
    value: "secret_key_value"
    enabled: true
  - key: customerId
    value: "12345"
    enabled: true

## Critical Rules

1. Always use [variable_name] for:
   - Base URLs
   - API keys
   - Environment-specific values
   - Reusable values

2. Never hardcode:
   - Secrets or credentials
   - Environment-specific URLs
   - Customer IDs or similar data

3. YAML requirements:
   - Valid YAML syntax
   - Correct indentation (2 spaces)
   - Proper string quoting for URLs and values

4. Structure requirements:
   - Every collection must have .resources/definition.yaml
   - Every folder must have .resources/definition.yaml
   - Request filenames must end with .request.yaml

5. Variable validation:
   - Verify all [variables] exist in environment files
   - Check variable names match exactly (case-sensitive)

## Editing Instructions

- Edit collection name: Modify name in collection's .resources/definition.yaml
- Edit folder name: Modify name in folder's .resources/definition.yaml
- Edit request: Modify the .request.yaml file directly
- Add/remove fields: Update YAML maintaining proper structure
- Change environment variables: Edit files in postman/environments/

---

## Best Practices & Common Mistakes

### All Variables Must Be Declared

Problem: Using [variableName] in URLs or parameters without declaring them in the environment file.

### Checklist for New Collections

When creating or updating Postman collections:

- [ ] Environments: Create environment files for ALL deployment environments
- [ ] Variables: Declare ALL variables used in URLs, headers, and bodies
- [ ] Consistency: Use same variable names across all requests
- [ ] Tests: Add minimum status code validation to every request and model validation if posible
- [ ] Model validation: Add response structure tests for GET endpoints
- [ ] Authentication: Include required headers (e.g., X-Api-Key, Authorization) for all protected endpoints
- [ ] Sample bodies: Provide realistic example JSON bodies for POST/PUT requests
- [ ] Documentation: Add comments in complex request bodies explaining field purposes